Wire Mesh, Sheet by Sheet: Sizing a Slab-on-Grade Order
The Wire Mesh / WWF Calculator is a takeoff tool for welded wire fabric — it converts a slab's length and width into the number of rolls or sheets you need to order, along with total weight and, in Advanced mode, a full material and delivery cost. Unlike an individual-bar rebar takeoff, wire mesh ships as pre-fabricated sheets or continuous rolls, so the core question isn't "how many bars fit the grid" — it's how many whole sheets or rolls cover the slab once lap splices at every joint and cut waste at the edges are accounted for. To choose between mesh, rebar, and fiber for a given pour, see our pillar guide on how to reinforce a concrete slab.
The calculator accepts slab length and width in feet, inches, or meters; an ASTM A1064 mesh designation (or a custom wire spacing and W-number); a roll, sheet, or large-sheet form factor; a lap/overlap distance at each sheet join; a waste percentage; and single- or double-layer placement. Four project-type presets — Driveway, Patio/Slab, Sidewalk, and Industrial Floor — load sensible starting values, and the calculator flags live if a light-gauge W1.4 mesh is selected for a driveway or floor preset that ACI 360R-10 says needs heavier wire. If you are weighing mesh against individual bars, see our rebar sizing & spacing reference; for the slab volume the mesh sits inside, how to calculate concrete for a slab; and to budget the whole pour, how much a concrete slab costs.
Wire Mesh Style & Sheet Size Reference
The industry term shifted along with the designation format: what most people still call "wire mesh" or WWF (welded wire fabric) is now WWR — welded wire reinforcement — the label ACI 318-19 uses to reflect that the fabric does real structural work, not just crack cosmetics. The current designation format under ASTM A1064 reads Spacing-L × Spacing-T – W-L × W-T. Take 6×6-W1.4×W1.4 apart piece by piece: the first pair (6×6) is wire spacing in inches — a wire every 6 in running both lengthwise and crosswise — and the second pair (W1.4×W1.4) is the cross-sectional area of each wire in hundredths of a square inch, so a W1.4 wire has an area of 0.014 in² (a 0.135-in diameter), and matching numbers on both sides mean the mesh is symmetric in each direction. A style written 6×6-W2.9×W1.4 instead carries heavier wire one way than the other — ACI 360R-10 allows this for one-way slabs, and the calculator's custom-designation field accepts it even though the preset dropdown doesn't list every asymmetric combination.
| Designation | Wire spacing | Wire dia. | lb / sq ft |
|---|---|---|---|
| 4×4 – W1.4×W1.4 | 4"×4" | 0.135" | 0.30 |
| 6×6 – W1.4×W1.4 | 6"×6" | 0.135" | 0.21 |
| 6×6 – W2.0×W2.0 | 6"×6" | 0.160" | 0.29 |
| 6×6 – W2.9×W2.9 | 6"×6" | 0.192" | 0.42 |
| 4×4 – W2.0×W2.0 | 4"×4" | 0.160" | 0.58 |
| 4×4 – W2.9×W2.9 | 4"×4" | 0.192" | 0.84 |
Old Gauge Numbers vs. Current W-Number Designations
A lot of competitor pages — and a fair number of older architectural drawings — still spec mesh by wire gauge (6×6 10-gauge, 6×6 6-gauge) rather than the W-number ASTM A1064 has used for decades. Gauge and W-number aren't the same scale, so a straight substitution is only approximate; the table below maps the gauges still floating around supplier catalogs to the nearest current designation.
| Old gauge | Wire dia. | Current W-number |
|---|---|---|
| 10 gauge | 0.135" | W1.4 |
| 8 gauge | 0.162" | W2.1 (commercial equiv. W2.0) |
| 6 gauge | 0.192" | W2.9 |
| 4 gauge | 0.225" | W4.0 |
8-gauge doesn't land exactly on a stocked W-number — its true cross-sectional area rounds to W2.1, and most suppliers fill that order with W2.0 stock rather than cutting a custom draw. If a spec calls out 8-gauge and the weight actually matters — a shipping quote, a structural check — use W2.1's numbers, not W2.0's.
Wire mesh also ships in three form factors, and the calculator's Form Factor field determines the sheet-size denominator used in the count formula below:
| Form factor | Dimensions | Coverage |
|---|---|---|
| Roll | 5 ft × 150 ft | 750 sq ft |
| Sheet | 5 ft × 10 ft | 50 sq ft |
| Large sheet | 6 ft × 20 ft | 120 sq ft |
These are the most common residential and commercial designations and form factors. Other designations (e.g. D-series deformed wire, heavier gauges) exist for structural and specialty applications — use the calculator's custom spacing/W-number input for those, and always confirm with a licensed structural engineer for load-bearing use.
Entering Your Wire Mesh Slab Dimensions
- 1Select a project type preset — Driveway, Patio/Slab, Sidewalk, or Industrial Floor — to load starting values for dimensions, mesh designation, form factor, and waste. Every value loaded by a preset can be overridden.
- 2Enter slab Length and Width, each with its own unit (feet, inches, or meters).
- 3Choose your ASTM A1064 Mesh Designation from the dropdown (4×4 or 6×6 spacing in W1.4, W2.0, or W2.9 wire), or select Custom to enter your own wire spacing and W-number.
- 4Choose the Form Factor — Roll (5×150 ft), Sheet (5×10 ft), or Large sheet (6×20 ft) — matching how your supplier sells the mesh.
- 5Enter the Lap / Overlap per Sheet Join (6 inches is the standard default) and set a Waste Factor (10% is typical; 15% for L-shaped or irregular slabs).
- 6In Advanced mode, choose Mesh Layers — single for slabs 4–5 inches thick, double for slabs 6 inches or thicker — and optionally enter a price per square foot or per unit plus a delivery cost.
- 7Press Calculate. Review the hero sheet/roll count, the gross coverage area, total weight, and — if a light W1.4 mesh is selected for a driveway or industrial floor preset — the ACI 360R-10 compliance warning.
How the Wire Mesh Sheet Count Is Calculated
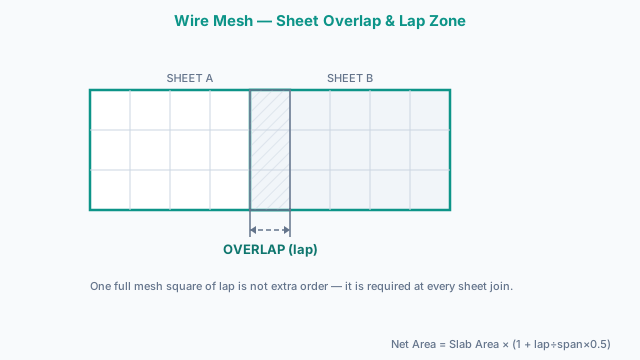
- 1) Slab AreaSlab Area = Length × Width
Both dimensions converted to feet before multiplication. - 2) Lap / Overlap AllowanceOverlap Fraction = Lap Distance ÷ Longer Span × 0.5
Net Area with Lap = Slab Area × (1 + Overlap Fraction)
Approximates the extra area consumed by lap splices at sheet joins. ACI 318 §25.8.1 requires a minimum lap of one full mesh spacing (typically 6 inches) at every joint between adjoining sheets or rolls. - 3) Gross Area with Waste and LayersGross Area = Net Area with Lap × (1 + Waste % ÷ 100) × Number of Layers
Waste covers cut edges, perimeter off-cuts, and on-site trim. A double-layer mat (top and bottom, for slabs 6 inches or thicker) doubles the gross area. - 4) Sheets or Rolls NeededUnits Needed = ⌈Gross Area ÷ Form Factor Area⌉
Always rounded up to the next whole unit. Sheet = 50 sq ft (5×10 ft); Large sheet = 120 sq ft (6×20 ft); Roll = 750 sq ft (5×150 ft). - 5) Total WeightTotal Weight (lbs) = Gross Area × Weight per Sq Ft
Total Weight (tons) = Total Weight (lbs) ÷ 2,000
Weight-per-square-foot values come from ASTM A1064 published data for each mesh designation. - 6) Custom Mesh Weight EstimateWeight per Sq Ft ≈ W-Number × 0.003 × 2 (for two wire directions)
Used only for custom designations not in the standard table, based on W-Number × 0.001 in² = wire cross-sectional area. - 7) Cost Estimate (Advanced Mode)Material Cost = Gross Area × Price per Sq Ft (takes precedence if entered)
Material Cost = Units Needed × Price per Unit (used if sq ft price is blank)
Grand Total = Material Cost + Delivery / Misc Cost
The most common site failure with wire mesh isn't under-ordering — it's mesh that ends up sitting at the bottom of the slab instead of mid-depth. Rolled mesh has memory and curls back toward the ground the moment a crew member's boot comes off it; without chairs or the "walk it up" technique of pulling the mesh to mid-height as the pour advances, the wire sits below the slab's neutral axis and contributes essentially nothing to crack control, no matter how correctly the sheet count was ordered. Slab bolsters rated for the pour depth, set every 2 to 3 ft in both directions, hold the mat at the right height without depending on a crew member's memory mid-pour — figure roughly one chair per 4 to 6 sq ft of mesh. Height matters as much as spacing: a chair sized for mid-depth on a 4-in slab (about 2 in up from the sub-base) is too short for a 6-in pour, where the target is closer to 3 in. A box of slab bolsters costs a small fraction of what re-pouring a slab with mesh sitting on the ground costs.
Worked Takeoff: 20 × 24 ft Slab-on-Grade
You are ordering mesh for a 20 × 24 ft slab-on-grade (480 sq ft) reinforced with 6×6 W2.9×W2.9 mesh in 5×10 ft sheets (50 sq ft each), a standard 6-inch lap at every joint, a single layer, and a 10% waste factor.
- Slab area = 20 ft × 24 ft = 480 sq ft
- Overlap fraction = (0.5 ft ÷ 24 ft) × 0.5 = 0.0104 (using the longer 24 ft span)
- Net area with lap = 480 × 1.0104 = 485.0 sq ft
- Gross area with 10% waste = 485.0 × 1.10 = 533.5 sq ft
- Sheets needed = ⌈533.5 ÷ 50⌉ = 11 sheets
- Total weight = 533.5 sq ft × 0.42 lb/sq ft = ≈224 lbs (0.112 US tons)
Ten sheets would cover the raw 480 sq ft footprint with almost nothing left for lap splices or edge cuts — the calculator's 11-sheet result leaves enough surplus to lap every joint per ACI 318 §25.8.1 without a mid-pour supply run. The calculator works through all six steps instantly, and the Print / Save button exports a formatted takeoff you can bring straight to the supplier.
Quantity Mistakes That Leave a Wire Mesh Order Short
- 1Forgetting the required overlap at sheet joints
ACI 318 §25.8.1 requires a minimum lap of one full mesh spacing at every joint between sheets or rolls — typically 6 inches for 6×6 mesh. Ordering strictly to the raw slab footprint, with no allowance for lap, leaves the crew short exactly at the joints where continuity matters most for crack control.
- 2Not accounting for cut waste at slab edges
Rectangular slabs waste relatively little mesh at the perimeter, but L-shaped, T-shaped, or slabs with cut-outs for drains, columns, or utility penetrations lose considerably more to trim. A flat 10% waste factor tuned for a simple rectangle will under-order on an irregular footprint — bump to 15% for complex layouts.
- 3Confusing sheet vs. roll pricing and coverage
A 5×10 ft sheet covers 50 sq ft; a 5×150 ft roll covers 750 sq ft — a 15x difference in coverage per unit. Getting a per-sheet quote and applying it to a roll-based takeoff (or vice versa) produces a wildly wrong material cost even when the square-footage math is correct.
- 4Selecting light-gauge mesh for a vehicle-load slab
W1.4 wire is adequate for sidewalks and patios but ACI 360R-10 recommends a minimum of W2.0 wire for driveways and industrial floors carrying vehicle loads. Ordering enough W1.4 sheets to cover the area doesn't fix an under-specified wire gauge — the calculator's compliance warning flags this before you order.
- 5Skipping the double-layer multiplier on thicker slabs
Slabs 6 inches or thicker typically call for two mats — top and bottom — not one. Selecting single layer when the design calls for double layer will leave the order short by exactly half the required mesh, since the layer count multiplies straight through the gross area.
When to Use This vs. Related Reinforcement Calculators
Use this Wire Mesh Calculator when the slab reinforcement spec calls for welded wire fabric (WWF or WWM) in roll or sheet form — it's the right tool for driveways, patios, sidewalks, and industrial floors where the primary goal is distributed crack control across large flatwork pours.
Switch to the Rebar Calculator when the structural drawings specify discrete deformed bars instead of a welded grid — it runs an individual-bar takeoff by length and width spacing rather than a sheet or roll count. If you already have a bar count or linear footage figure and just need the procurement weight conversion, use the Rebar Weight Calculator. To verify that a rebar layout meets ACI 318-19 §25.8.1 minimum clear-spacing requirements, use the Rebar Spacing Calculator. Once reinforcement is quantified, complete the takeoff with the Slab Concrete Calculator for the concrete volume and the Concrete Bag Calculator to convert that volume into pre-mix bag counts.
A third option skips steel altogether: synthetic or steel micro-fiber mixed straight into the batch at the plant. Fiber is the fastest to place — no chairing, no lap splices, no risk of a mat sinking to the bottom mid-pour — and it's usually the cheapest per yard. What it doesn't do is replace continuous reinforcement across a wide slab: fiber controls plastic-shrinkage cracking at the surface, but it can't hold a crack tight the way a bonded mesh grid does once the slab starts moving. Our honest read: fiber alone is fine for a sidewalk or a small patio on a well-compacted base; wire mesh earns its keep on anything wider than roughly 12 ft or carrying vehicle loads, where distributed steel actually resists the wider cracks fiber won't stop; and rebar is the only one of the three built for a structural, load-bearing element. Pairing fiber with mesh — fiber for shrinkage, mesh for crack width — is common on driveways and adds little to the per-yard cost.
ASTM Material Specs
The current governing standard for welded wire fabric (WWF/WWR), defining mesh designations in the Spacing-L × Spacing-T – W-L × W-T format, wire diameters, cross-sectional areas, and weights per square foot used directly in this calculator's designation reference table.
The historical plain-wire WWR specification, now consolidated into ASTM A1064/A1064M. Mesh labeled or specified under the older A185 designation is dimensionally and structurally equivalent to its A1064 counterpart — suppliers and older drawing sets may still reference it.
Section 25.8.1 sets the minimum lap splice requirement for welded wire fabric (one full mesh spacing) used in this calculator's overlap allowance calculation, and governs reinforcement requirements for structural slabs using wire mesh.
Recommends a minimum W2.0 wire for slabs subject to vehicle loads such as driveways, garage floors, and industrial floors — the basis for the calculator's live compliance warning when a lighter W1.4 mesh is selected for one of those project types.
Welded wire reinforcement controls shrinkage cracking but is not a structural substitute for deformed rebar in load-bearing slabs; confirm mesh gauge, spacing, and concrete cover with a licensed structural engineer per ACI 318-19 §26.6.
Wire Mesh Takeoff FAQ
What is a wire mesh calculator?
A wire mesh calculator is a tool that estimates how many rolls or sheets of welded wire fabric (WWF) you need for a concrete project based on slab dimensions, mesh designation, lap-splice allowance, and waste factor. It also calculates total weight and, optionally, material and delivery cost.
How does a wire mesh calculator work?
The calculator multiplies slab length by width to get the base area, then adds an allowance for the lap splice required at every sheet join. It applies your waste factor and layer count to get a gross coverage area, then divides by the roll or sheet size and rounds up to get the total units needed.
How many sheets of wire mesh do I need for a 20×24 concrete slab?
For a 20×24 ft slab (480 sq ft) using 5×10 ft sheets (50 sq ft each) with 6×6 W2.9×W2.9 mesh, a 6-inch lap, and 10% waste, the takeoff works out to 11 sheets and about 224 lbs of mesh. Use the calculator above for your exact dimensions and designation.
What is the difference between W1.4 and W2.0 wire mesh?
W1.4 and W2.0 refer to the cross-sectional area of the wire in hundredths of a square inch per ASTM A1064. W1.4 wire has a 0.135-inch diameter and weighs 0.21 lb/sq ft in a 6×6 spacing — suited for light slabs. W2.0 wire is 0.160 inches in diameter and weighs 0.29 lb/sq ft — recommended for driveways and garage floors subject to vehicle loads.
What mesh should I use for a concrete driveway?
ACI 360R-10 recommends a minimum of W2.0 wire for driveways subject to passenger vehicle loads. The most common specification is 6×6 W2.0×W2.0. For driveways that see heavy trucks or RVs, upgrade to 6×6 W2.9×W2.9 or consider supplementing with rebar.
What is the lap splice requirement for wire mesh?
ACI 318 §25.8.1 requires that welded wire fabric overlaps by at least one full mesh spacing at each joint. For 6×6 mesh this is a minimum 6-inch lap; for 4×4 mesh it is a minimum 4-inch lap. In practice most contractors use a 6-inch lap on all mesh to simplify placement.
What is the difference between a roll and a sheet of wire mesh?
Wire mesh rolls are large continuous pieces — typically 5 ft wide × 150 ft long (750 sq ft) — used for long sidewalks, large slabs, and commercial projects where continuous runs are efficient. Sheets are pre-cut panels — commonly 5×10 ft (50 sq ft) or 6×20 ft (120 sq ft) — easier to handle on smaller residential jobs and transport in a pickup truck.
Is wire mesh the same as rebar?
No. Wire mesh (WWF/WWR) is a pre-assembled grid of welded steel wires that provides distributed crack control across the full slab area. Rebar consists of individual deformed steel bars placed in a grid pattern on site. Wire mesh is faster to install for flatwork; rebar provides higher structural strength and is required for load-bearing elements like beams, columns, and foundations.
When should I use wire mesh instead of rebar?
Wire mesh is best for large flatwork pours — driveways, sidewalks, patios, warehouse floors, and slabs-on-grade — where the primary goal is crack control rather than structural load transfer. Rebar is required for load-bearing elements, elevated slabs, footings, walls, and any application governed by a structural engineer's drawing.
How do I calculate the weight of wire mesh for delivery?
Multiply the total gross mesh area (including lap and waste) by the weight per square foot of your chosen designation. For 6×6 W2.0×W2.0 at 0.29 lb/sq ft: 500 sq ft × 0.29 = 145 lbs. The calculator performs this automatically for all standard and custom designations.
Should I use a single or double layer of wire mesh?
A single layer placed at mid-depth is standard for slabs 4–5 inches thick. A double layer (top and bottom mat) is used for slabs 6 inches or thicker, elevated structural slabs, two-way slabs, and applications specified by a structural engineer. Double-layer installations roughly double the material required.
How much waste factor should I add for wire mesh?
Add 10% for simple rectangular or square slabs where cuts are minimal. Use 15% for L-shaped, T-shaped, or irregular slab footprints where more cutting is needed at edges and cut-outs. On very large rectangular pours using rolls, 5–8% may be sufficient.
Why did the calculator warn me about my mesh selection?
The ACI 360R-10 compliance warning appears when a light W1.4 designation is selected together with a Driveway or Industrial Floor project type — both subject to vehicle loads that ACI 360R-10 says need a minimum W2.0 wire. Upgrade the mesh designation or supplement with rebar to clear the warning.
Is the wire mesh calculator free to use?
Yes. The Wire Mesh / WWF Calculator on Concrete Calculator Max is completely free to use with no registration, subscription, or hidden fees. You can calculate unlimited projects and export PDF reports at no cost.
Can I print or save my wire mesh estimate?
Yes. After calculating, press the Print / Save button to open a print-optimized report showing all your inputs and results. In your browser's print dialog, select Save as PDF to keep a digital copy for purchase orders, permits, or contractor bids.
What's the difference between old wire-gauge mesh and current W-number mesh?
Gauge numbers (10-gauge, 8-gauge, 6-gauge) describe wire diameter on the older Washburn & Moen scale; W-numbers describe the wire's cross-sectional area in hundredths of a square inch under ASTM A1064, the standard currently governing welded wire reinforcement (WWR). The two scales land close but not identical — 6-gauge works out to about W2.9, while 8-gauge falls between W2.0 and W2.1. If a drawing or supplier quote uses gauge, convert it to a W-number before pulling weights off an ASTM-based table.
How far apart should wire mesh chairs be spaced?
Space slab bolsters rated for your pour depth every 2 to 3 ft in both directions — roughly one chair per 4 to 6 sq ft of mesh — and set the chair height so the mat lands near mid-depth: about 2 in up from the sub-base on a 4-in slab, closer to 3 in on a 6-in pour. Skipping chairs and relying on crew members to lift the mesh mid-pour is common but unreliable; wherever a chair isn't holding it, the mesh drifts back to the bottom and stops contributing to crack control.
Related Calculators
Rebar Calculator
Estimate rebar bars, linear footage, weight, and cost for slabs, footings, and walls.
Rebar Spacing Calculator
Calculate rebar bar count from a target c-t-c spacing or find spacing from a bar count, with ACI 318-19 compliance checks for slabs, footings, walls, and beams.
Slab Concrete Calculator
Estimate concrete for slabs, patios, and floors.
Concrete Sidewalk Calculator
Estimate concrete volume, bags, and cost for slabs, patios, and floors.
Concrete Driveway Cost Calculator
Estimate cost of concrete for driveways.